Arpicade JAMMA adapter - 4 player version


Includes tax / shipping cost not included
Ready to ship!
This items ships quickly
- Order number: ARPICADE4PL.29


Privacy Information: The sharing buttons are implemented as a link. No data will be transmitted to third parties without interaction.
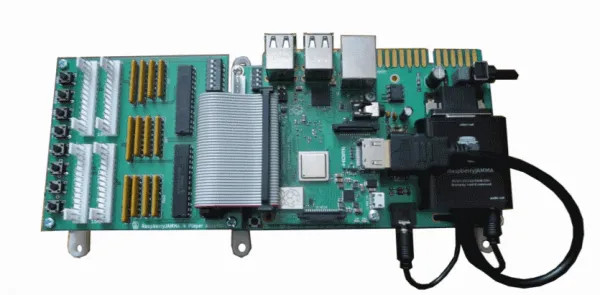
Welcome! You are about to get involved with the FIRST 3 or 4 Player Multi for your dedicated cabinet! Yes, this will allow you to play all your favorite 3 and 4 player games in a single CGA (Old School Tube Monitor) cabinet!
We also understand that some of these old tube monitors are harder and harder to fix/replace/find. So, we have changed up some things so you can use a LCD (Flat Screen Monitor) in your arcade cab!
- The Arpicade will run on all standard JAMMA harness cabs. Yep. Standard JAMMA.
- The 3 or 4 player Arpicade simply plugs into your wiring harness. No need for an adapter (wall wart) to plug into the Raspberry Pi 3b+.
- The power comes from the standard JAMMA harness (which gets it from your switcher inside your cabinet.

The ArPiCade is a Raspberry Pi JAMMA adaptor that converts a RPi into a true JAMMA board, intended for you to do whatever it is you want with.
- No modification to your JAMMA cab is required (unless you want to add a kick harness).
- It can be configured for normal JAMMA (w/ optional kick harness) or for 6 buttons on JAMMA via dipswitches.
- Video out is RGBS on JAMMA or can be reconfigured to output higher resolutions through VGA.
- The board features amplified mono sound or line level stereo can be used

Want to know the cool thing?
The wiring harnesses (purchased separately) is what connects your additional 3rd and 4th player controls. You can do it yourself, or just purchase from Highscoresaves. Your player 1 and 2 controls are already there on the standard JAMMA harness. HOWEVER, they do not go past the 3rd button...ever. Some will only have one or two buttons connected. This is an issue you need to solve before using this product. Some of you may drill additional holes in the control panel because the buttons don't exist.
Let me give you an example...XMEN.
XMEN requires you to use 3 buttons (the 3rd being for MUTANT POWERS). Well, you cannot do that on a 4 player, 2 button cab. Does the cab have the 3rd button wire on the standard JAMMA harness? You need to look and verify. The harnesses are for players 3 and 4 only.
Now, there is a connector on the original Arpicade that allows you to use buttons 4, 5 and 6 (think of the bottom row of buttons on a Street Fighter). That's cool and that is what the 6 wire harness is for. If you don't plan on using the Arpicade on those type of games, then, you do not need the 6 pin harness!
Heres a pick of that connector -

Let's look at the information below -
What type of Raspberry Pi do I need?
We try to make this simple. The easiest way is to purchase through us. But, you are free to order from wherever you like. The images are only compatible with the Raspberry Pi 3b+, so, as of today, that is the only one we carry. If you have your own, cool! Just make sure it is the proper one. You have to verify it is the 3B+, we don't know what you already have.

- The Images are designed to work on RPi 3B or 3B+ only. The Arpicade does work with Raspberry Pi 4, but not our images. Check out the Tech Forum for that.
- Raspberry Pi 3B+ is not included. Must provide your own or purchase separately.
- We have limited stock of the Raspberry Pi 3B. Order here if they are still available - https://highscoresave.com/raspberry-pi-3b-plus-motherboard/
- CAUTION - WHEN INSTALLING THE 4 PLAYER ADAPTER PCB, YOU NEED TO ENSURE THAT THE PINS ARE ALIGNED PROPERLY. AGAIN, ENSURE PINS ARE ALIGNED PROPERLY OR YOU CAN BURN OUT YOUR Pi! THERE SHOULD BE A SMALL GAP ON THE SIDE THAT YOU CAN SEE THAT THE PINS ARE CONNECTED TO THE 4 PLAYER ADAPTER PCB.
Tech Forums (Click Pic)
![]()
Harnesses -
These are harness options if you do not like wiring your own. These are premade and designed to be plug n play.
You will need a -
- 6 pin harness if you want buttons 4, 5 and 6 to work on player 1 and player 2
- 9 pin harness for Player 3 and Player 4 (two harnesses total) for a Konami Cab/Image
- The harnesses go from the adapter to your control panel. So, to make it simple, see below.

The 6 pin harnesses will have 6 wires populated on the 6 pin connector. There will be 3 additional wires that are not connected to anything on either end. That's ok, just tuck/wrap them out of the way. This has a ground wire daisy chain on it.
The 9 pin harness does have a 15 pin connector. WHAT?!?! I don't want to confuse anyone, that's just the way it came from the factory. They only use 9 wires though. Some of the connector will have empty spaces with no wire. This has a ground wire daisy chain on it.
Now, some of you may already have 3 and 4 player kick harnesses with your current game. AWESOME! Use them if you can. These harnesses are created with the mindset that you do not have those.
- The 9 pin (not fully populated 15 pin connector) Konami harnesses go with the Konami Image


- Raspberry Pi 3B+ is not included. Must provide your own or purchase separately.
- We have limited stock of the Raspberry Pi 3B. Order here if they are still available - https://highscoresave.com/raspberry-pi-3b-plus-motherboard/
- Arpicade images are not returnable, however, happy to exchange if there is an issue.

- Scroll down to bottom of page to view Game List PDF's (Available Downloads Section)
- This is an open source project. You can add or delete any ROMs you have in the proper emulator
Great plug and play JAMMA pcb
I bought the works package! The JAMMA 4 player kit, a Raspberry Pi and the 17 game Konami image to play Turtles in Time (and all the other games) in my TMNT cab.
I chose to have the TMNT menu screen themed to TMNT also! Very happy with this!
Great experience!
Was pleasantly surprised the package arrived so quickly! Well supported and packing slip inside. I didn't see any instructions so I emailed and asked why. I was told that they never put inside box because all of its online in either pdf or on a link. They emailed the link even though I could have searched the site. Thank you for your great customer support!
Shipped out fast
Thanks. Ordered this and am having fun tweaking the already cool menu! Easy for the family to select games (my children are 8 and 10) and they are finding new stuff I don't even remember back in the day!
Shipped out fast
Never have to buy another TMNT pcb. Added in thus to my cab and can play all the Konami games without having to pull out the cabinet to swap pcbs. This is an easy tonuse Raspberry pi adapter that plugs directly into the wiring harness. Highly recommend for everyone!!!
Thanks Highscoresaves.com!
This is one of the best gifts I ever bought myself!
1. Easy to order
2. Shipped the next day
3. Well packaged
4. Plug and play. (I bought the RPi3B+ and the 80 game image) They were already put together so all I had to do was plug onto my JAMMA harness.
5. Played all night!!
Thanks again for everything! Highly recommended!!
Didn't know this existed! I do now!
Replaced this (along with a Raspberry Pi 3B+) in our TMNT cabinet. Plays all the Konami games plus thousands of others with a cool easy to use menu.
This was an easy thing to get my TMNT cab working again
Good kit, now can play multiple 4 player gamed in the TMNT cabinet
Easy to use JAMMA adapter setup
This is a great setup!
Amazing game product. Easy to use.
This is a cool product! The Arpicade is exactly what I needed
My TMNT cabinet loves this! Plug n play with the SD card and the family is enjoying it!
An easy solution to run all the 4 player games!
Thanks! Installed in less than 10 minutes and was playing TMNT and The Simpsons!
Excellent
Great product, shipped fast. Used the forums to answer a few quick questions and been playing since!
Exactly what it is supposed to be
The 4 player Arpicade is 100% plug and play. I was up and playing all my favorite games within minutes of receiving the package. Joe and staff went above and beyond to answer any and all questions I had before during and after my purchase. I have played most of the games all the way through and have 0 issues with any of the games. Thank you for helping me clean out my pcb collection ! this is the way forward and I am never looking back !
Had to wait a while for this to be built. Nice that I was informed by email about this, I didn't mind waiting but my husband did. Received a tracking notice email and it arrived safely. Well packaged and we were playing TMNT in about 10 minutes. We are ve
I never need to buy an original pcb again. This thing is too awesome!!
As simple as it gets. Ordered the whole package with all the options. Pulled out of the box and plugged it in. So so so cool!
Why don't I have power when I plug it in?
With the 4 player adapter, it is important to line up the pins properly when inserting into the main jamma adapter. Properly fitted, the outer edges of each PCB will line up if looking overhead. See pic below -

There are issues if you misalign. ie no power. the JAMMA adapter fuse will blow if this happens to save the board. But, agaim, no power will get through the JAMMA adapter to the Pi.
Other items could be bad SD card or a dead Raspberry Pi. Or, you may have an issue with your game cabinet wiring/power supply.
If you are in need of repair, click the button.
Learn moreHow do I change the theme?
1) Plug in keyboard to USB port on Raspberry Pi
2) Power on machine
3) While in main Attract Mode, press Tab on your keyboard
4) Using up/down on your keyboard, navigate to Displays
5) Using up/down on your keyboard, navigate to All Games
6) Using up/down on your keyboard, navigate to Layout
7) Press Enter
8) Using up/down on your keyboard, navigate to the theme of your choice
9) Press Enter to confirm your selection
10) Press Escape twice to return to Attract Mode
11) Restart your machine if the new Attract theme is not automatically updated.
How do I enable hi-res the easy way?
You need to adjust the resolution in /boot/config.txt to high res also uncomment the change to highres options in
/boot/launchers/servMenu.sh and adjust the system to highres in the Attract-Mode service menu (left/right on the
keyboard or cab service button in the menu to find the service menu). Do not launch a game before changing
the resolution like this or the launcher script could change the res to one unsuited to your monitor.
The SD image is sized smaller than the memory card I want to use how can I resize it?
The image is sized for an 8 gig card as it's the minimum usable size. To use a bigger card you will need to use
the partitioning program of your choice to move the 2nd partition to the end of the image and resize the first
partition to fill the newly created space in the middle of the card. Before resizing the first partition copy it's
contents to your computer as resizing will destroy the contents, then copy it back when resized and you should
have a working image.
Why don't my roms work?
Different versions of MAME use different romsets, some roms will work across many versions of MAME others
won't. You can convert romsets using programs like romcenter and datfiles for the emulators.
How can I set FREEPLAY?
The games that originally had freeplay options in dip switches can be set using the mame menus or in
AdvanceMAME only through the config file line:
misc_freeplay yes
however not all games had a freeplay mode and also a lot of games do not show an attract mode when set to
freeplay so you will probably want a coin slot/button or button combo to add credits in mame.
Games which used test menus can have their test menus accessed by pressing the cabs Test button/switch or
'F2' on a keyboard during the game.
You can also use the shortcut P1 Start (long hold) + Button 1 for credits.
How do I change the bootsplash?
Make the boot splash you want and copy it to the memory card in the boot partition as "splash.png". Boot Pi
with USB keyboard attached, wait for menu to load, press "esc" to exit menu and copy your new boot splash to
the system as a super user:
sudo cp /boot/splash.png /etc/splash.png
Then reboot to see if it worked out how you wanted.
sudo reboot
This can also now be achieved from Attract-Mode (cab service button OR left or right on a keyboard to find the
service menu) or advmenu using the F8 menu and the /boot/config-updater folder by placing the new picture you
want in the folder as splash.png the pressing F8 in advmenu and using the option to update the splash.
How do I change the software from low res to high res to use with my other cab or a monitor change?
You start by setting the Pi to the resolution you want in
/boot/config.txt
using the
hdmi_mode=
setting you desire. This will ensure the hardware boots at the resolution you want and is the first thing to do.
You will then need to edit the service menu launcher script (boot/launchers/servMenu.sh) to uncomment
(remove the ‘#’ hash) the highres options. After a reboot the option will be available in the service menu. When
the relevant option is selected the system will reconfigure itself and reboot in the selected settings.
Do I need to safely shutdown the board in any way?
I recommend exiting a game so as you are at the game menu before shutting down your cabinet. It should not
be necessary to run a shutdown script as while at the game menu there are no writes to the SD card to be
interrupted to corrupt the card. If you make changes to your systems settings I recommend a shutdown or
reboot to ensure those changes are written to the SD card. (but have a backup just in case things go bad some
day)
Why so many versions of MAME?
Each version of MAME included has it's strengths and weaknesses, to get the most out of the system a bit of
mixing and matching is required.
MAME 0.172 is the latest recommended version and has the best emulation quality although it's performance
is highly variable between titles.
AdvanceMAME has many more options and more accurate emulation than MAME4All or
MAME2003/MAME078 as well as better performance than MAME0172.
Mame4all has faster emulation and is useful for any games which run slow in the other emulators, although it
has the least accurate emulation of the MAMEs included (it is based on 15 year old MAME).
MAME072 (MAME2003 Retroarch core) has hacks built in to speed up the emulation of some Midway DCS
audio titles. This emulator is slowly improving and is still under active development. It is also very good at
mapping analog controls to digital JAMMA controls.
What are the joystick shortcuts and what do they do?
- Hold 1P Start for a couple of seconds + 2P Start exits a game back to the menu.
- Hold 1P Start for a couple of seconds + P1B1 == Credit
- Hold 1P Start for a couple of seconds + P1 Joy Down == Pause/Unpause
- Hold 1P Start for a couple of seconds + P1 Joy Right == MAME menus (MAME only)
How do I add ROMs?
Arcade roms should be placed in
/boot/roms/*/%.zip
where "*" is the emulator and "%" is the game. Roms must be in the correct directories and named and zipped
according to the conventions of the relevant emulator.
The exception to the arcade rom storage system is Daphne, its roms are stored in /boot/roms/daphne/rom and
framefiles in /boot/roms/daphne/framefile/(directory with same name as the rom) due to the way the emulator
works.
Console roms in:
/boot/roms/consoles/*/%.ext
where "*" is the emulator, "%" is the game and “ext” is the relevant extension. Roms must be in the correct
directories and generally must be unzipped (except advmess). Names of console roms are not critical as they
are for arcade roms, name them so you can identify them in the menu.
Rom scanning is automatic at startup by default but can also be done manually through the service menu.
Make sure to safely remove/eject your SD card before pulling it out of your PC.
How do you edit game list?
You can actually edit the game list from the game list. Press 'e' on a keyboard to edit the highlighted option.
I don't recommend playing around with the terminal unless you know what you're doing but you can press 'f4' to exit the game select menu then 'f4' again to exit the service menu (which also includes an option to scan the roms) to a terminal. Please note, any hand made edits to the game list will be lost next time the rom scanner is run.


