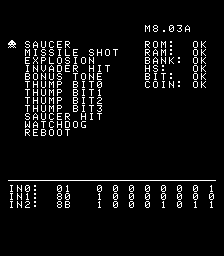
When the game first powers up, it performs a series of selftest diagnostics to insure the game is operating properly. This kit can also be a useful tool for debugging broken boardsets.
The first thing the kit does is in an internal checksum of the code eprom which is contained on the kit. If the checksum fails, the kit cannot continue. It will attempt to display a rom checksum failure message on the screen and after a few seconds, the game will reset because of the watchdog reset circuit will repeat the powerup selftest. A eprom checkum failure usually indicates a problem with the kit itself.
After the eprom checksum test passes, the kit performs an extensive Dynamic RAM test. The test writes various patterns (accounting for aliasing), with various hold times to increase the DRAM coverage. If the ram test fails, the diagnostic then performs additional testing to narrow down and isolate the suspected failed ram chips. During the memory test, you may see patterns on the screen that look similar to those below.

memtest patterns

memtest patterns

memtest patterns

memtest patterns

memtest patterns

memtest patterns
If the memory test passes (normal case), the selftest will continue on to other hardware tests.
If the memory test fails, the software will pulse out a series of sounds indicating the FIRST bad RAM chip location. This is very similar to how Atari selftests function. That is, the number of "beeps" indicate the first suspected chip. That chip then needs to be replaced, and then the test rerun to identify any other faulty chips. Again, this test only indicates one chip failure at a time. It should be noted that these types of memory tests are not a 100% guarantee that the identified chip is indeed wrong. In some cases the problem can also be broken traces on the boardset, or problems with other chips (eg. drivers, buffers, etc...). So use it as a guide.
When the memory test fails, a few seconds later after the chip code has been pulsed out, the game will reset because of the watchdog reset circuit and the powerup selftest will repeat. The table below is used to map the number of "beeps" (missile shot sounds) to the suspected bad memory chip.
| Beeps | Chip Location | Beeps | Chip Location |
| 1 | G8 | 9 | H8 |
| 2 | G9 | 10 | H9 |
| 3 | G10 | 11 | H10 |
| 4 | G11 | 12 | H11 |
| 5 | G12 | 13 | H12 |
| 6 | G13 | 14 | H13 |
| 7 | G14 | 15 | H14 |
| 8 | G15 | 16 | H15 |
Bit Error -
The SI game has a circuit on it for assisting in bit shift operations. It gets used by several games like SI and SID. The powerup selftest runs an extensive diagnostic on this circuit and the diagnostic has found that it fails in some bit patterns. I think I run like 4096 patterns through it or something like that.
There are several different variations of that circuit depending on the board types, but the common one that fails is the one that uses a daughter card on the sound card. If that daughter card is not making good contact it sometimes gets reported as a BIT FAIL by the diagnostic. If you have the type of board that has this daughter card, then I suggesting reseating it and/or cleaning its contacts. I think there is also a version that the entire daughtercard is implemented in a custom IC. There is another version where the daughter card chips are layed out directly on the soundboard. They all perform the same function, but done differently. The diag exercises this function.
It is possible because the diagnostic runs an extensive test on this circuit that the circuit may "appear" to work fine during gameplay. Or you might notice an occasional pixel from an invader that does not get shifted correctly as the invaders work their way down the screen. I would try reseating the shifter board or chip. But the error is not fatal and you can still play the multigame even with the failure, but be aware it could mean some of the gameplay on some of the games will not always work correctly.
Posssible solutions -
- On Space Invaders....the shifters are the four 25S10 chips on the daughter board. Midway issue a service bulletin stating a supply problem with the 25S10's and replaced them with eight 74151 chips. I assume this was a satalite board that plugged into the existing locations of the four 25S10's. If you have a Space Invaders Deluxe daughter board....it's an entire different set of chips.
- On SI pcb, the 25S10's are at locations A4/B4/C4/D4.
- Do you need to replace those? Sometimes. Or....check for bad solder.....or just try re-flowing it...see what happens.
- Or if you've got an earlier boardset it actually has the MB14241 chip instead of the daughterboard....
- Clean the edge connector
- MB14241 chip is bad. Removing from the socket, I found that the legs of the chip were pretty corroded. I cleaned them as well the edge connector again, and that seems to have solved my problems! Sometimes sockets need replaced and eprom legs cleaned with alcohol/dremel/fiber glass pen to remove corrosion.

selftest

testmode


